The best keyboard app available out there? The first one on the list would be the Gboard by Google. For starters, it can be your perfect choice of a keyboard because it offers a ton of features which other keyboard apps don’t. To begin with, we have in-app integration of the Google Search, Maps, and translation in Gboard. These features can be pretty handy and most of the times, I end up using any of these. Other than these, there are other features like a dictionary, which will learn the words you type and suggest the next time when you are typing to make your work easier.
Everything goes well, but voice recognition while using the Gboard app is not working fine for some users. Well, if you are someone who uses the voice recognition to send in a quick message while doing your other work, this microphone issue hits you hard. Here, we have several methods to fix the issue ‘microphone not working’.
1. Enable Voice input key
The first time you want to use the speech to input text on the Gboard app, you will be prompted to enable it in the app settings first. Enable the same if it disabled or if it is already enabled, try disabling and re-enabling it again.
First up, open your keyboard by just clicking on the search bar on the home screen and click on the settings icon shown in the top bar.

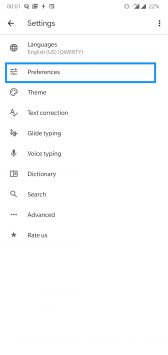
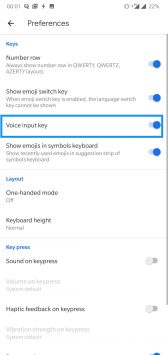
After entering the keyboard settings, click on “Preferences”. In the preferences, enable the “Voice input key” if it is disabled or if it is already enabled, disable it and enable it back again.
And that’s it, you can now start using your microphone to enter text.
2. Installing correct Language packs
Just like Google, Gboard also has several language packs available for you to install. The issue arises when you try to speak in a language and that language pack is not installed. To check if you have the correct language pack, open up the keyboard settings just like you did in the previous process then select “Voice typing” and “Languages”.
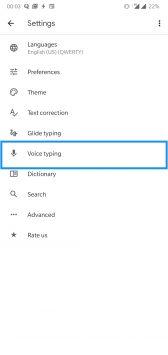
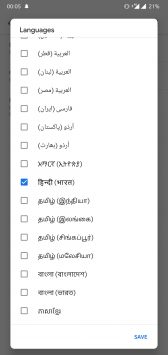
In there, scroll through the languages and check if the language you have used to enter as text is installed or not. If not, select the language you want to type in and you are all set to go.
3. Enabling Google Search
This is a solution some users have reported that it worked. It is so simple and all you have to do is enable the Google Search on your Gboard app if it is not already enabled. Just go to the settings of the keyboard, select “Search” and in there, enable Show “Search and more” button.

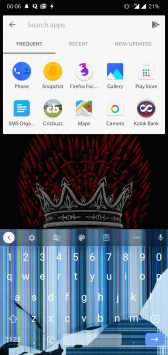

If the Google logo is not visible before on your keyboard, it will be displayed on the top left corner of your keyboard and now you can test your microphone.
4. Check App permissions of Gboard
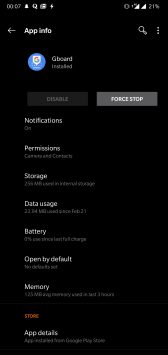
Permissions play a crucial role in functioning of an app properly. For the Gboard app to function properly, you have to enable a few permissions. To check the permissions, go to your device Settings, go to apps, select Gboard and then select App Permissions.

In here, enable the Microphone permission if it is not enabled or disable and enable it if it is already enabled. That’s it, you can now check your microphone.
5. Disable Power Saving Mode for Gboard
On every Android device, there is a power saving mode which works in a certain way to save the battery. Here, in the case of Gboard, the power saving mode on your device might be cutting off the microphone access to the Gboard app in order to save the battery. In order to remove this, go to your device Settings and search for battery saver, remove any saving mode and select “No Restrictions”.
That’s it, your microphone should work properly at any of the above steps until the last one. If you still can’t make it work, comment down below so we can help you out.


")


Thanks for sharing…
Aww man I swear I have tried EVERYTHING on my Fire 8 HD tablet, including all of your suggestions, but nothing has been able to fix my audio-to-text feature in GBoard. The similar feature works just fine in my Google app, the microphone you click next to the search field, but not for converting talk to text in GBoard.
Any ideas for Fire tablets? Have you ever heard of this problem being specific to Amazon tablets running Lawnchair that aren’t rooted? I can give you any specifics you need. but ya I’m running Lawnchair so I don’t have to use the lame Fire OS, and have installed all the necessary Google apps such and Services.
Problem might be that I’m missing 2 of the options I’ve seen listed in your article and others as possible fixes. More specifically, I don’t have the ‘add voice input’ key you mention under settings >> preferences. Everything else looks exactly the same, my settings just doesn’t have that option listed. The only other thing I’m missing is the ability to download languages to my device. Or it may be done a different way and I can’t find it. But I don’t think that’s related to the problem because I’m just using the standard English (US) language and I’ve tried every possible keyboard.
Am I able to access the GBoard property for ‘voice input’ using ADB? Then maybe I could set it manually through command prompt or terminal thru the ADB shell??
Any help or advice you could provide would be much appreciated. Thanks.
I tried everything on my Moto G Fast, like clearing Gboard cache and storage, enabling language input, which was already enabled anyway but I turned it off then on again just to be sure, I checked and I had the right language setting and Gboard had permission to use the microphone, and I shutdown and restart, all of that, but still no microphone on my keyboard when opening that keyboard with the Google search widget.
My solution, which is working like a charm? I long tapped the search bar, dragged it to remove it and then replaced it with the Firebox search bar Widget instead. Now I have a search bar at the top of my phone’s home screen again, and if click on it I also have a microphone on my keyboard. I can both talk and type entries, or talk and then edit anything wrong before entering and everything else seems to be the same–it still seems to be using Google to search–only technically the search browser is Firefox rather than Chrome, but that’s like no big deal on my phone, right? I just needed a search bar widget that gives me a microphone on the keyboard and now I have it and it is still Google search and all that.
This solution only takes seconds: Click and hold on the Google search bar until you see the “x remove” appear and then drag that search bar there to remove it. Next, touch and hold any clear area on your home screen until the selection menu appears, go to > widgets and just find the Firefox search bar widget that looks pretty much exactly like the Chrome search bar widget you just removed. Select it and then drag to place it on your home screen or wherever you want it, like maybe right where your previous search bar was just moments ago. It looks exactly the same and all will pretty much be the same, except you will have a microphone on your keyboard again. It doesn’t matter if it’s a “Firefox” search bar widget or that the results window is technically in a Firefox browser rather than Chrome browser, because once I enter something it still searches using Google and still gives me results to select from.
That’s weird that the audio to text didn’t work on your Moto. I have the Moto Power 2021 model and I’ve never had a problem with my audio to text working on that phone. I just can’t get it to work on my Amazon Fire HD 8 (2020) Tablet and that’s the device I could really use it on a lot more than my phone.
I already got rid of my Google Search widget a while back cuz I installed sesame on my fire tablet so that I could search my apps thru that search bar which you can’t with the google one. So I have Sesame with Lawnchair as my search bar & launcher. But I’ll try removing the Sesame bar cuz I don’t think it has a mic ability, and replace it with the one you’re talking about. What’s that name of the search widget you’re using exactly? is it built in to the Android OS?